
Bathroom Vanity and Mirror in an HDB Flat in Singapore: Wall-Hung or Floor-Standing, Basin Pipe and Mirror Light Point to Settle Before Tiling
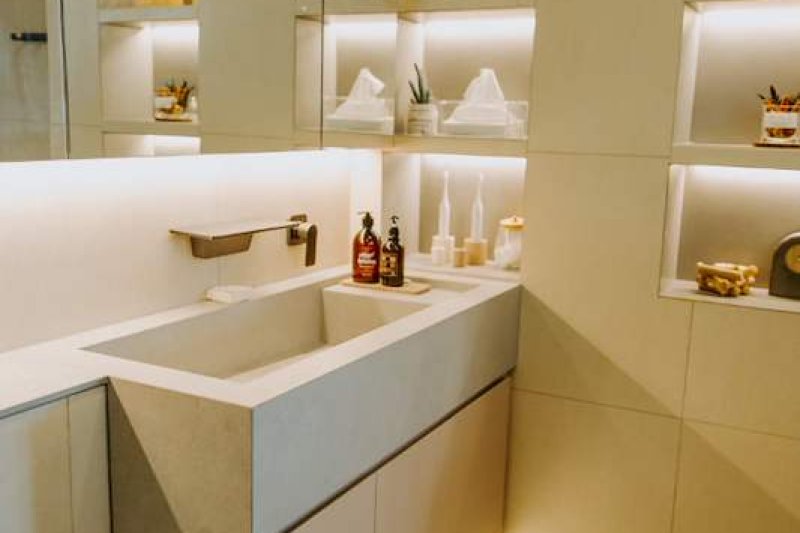
Pictured above: a vanity with a stone basin and a tap set into the wall, a mirror cabinet with a light strip beneath it, and lit niches beside it, from our project archive (140BB). Each part you see here is fixed at a different stage of the works, and each one had to be placed before the stage after it could start.
In most bathroom renovations the vanity is the last big item to arrive and the first thing the owner imagines. It is chosen from a catalogue or a showroom, and the contractor is told "vanity and mirror, please". Then the bathroom is tiled, the vanity is carried in, and the basin sits a hand's width from where the tap pipe came out, the mirror light has no wire where the mirror cabinet ended up, and the cabinet door hits the shower screen. None of that is a defect in the vanity. It is a decision that was made after the walls had already closed.
This guide is for an HDB owner who is about to renovate a bathroom and wants a vanity and mirror that fit. It uses only what this site already publishes: our bathroom process and timeline, the electrical rates on the room cost calculator, and the fact that our vanity cabinets are built in our own Singapore carpentry factory. It gives no price for a vanity, because we do not publish one. What it covers is the order of decisions.
The short answer
- The pipes and the wire come first. On our published bathroom process, plumbing and electrical re-routing is done around days 3 to 5, and the vanity is installed around days 15 to 17. By the time it arrives, the basin position has been buried in the screed and the wall for about two weeks.
- Decide wall-hung or floor-standing, and the basin type, before the plumber starts. Each puts the supply and waste in a different place.
- Decide the mirror cabinet's width, and where its light and any demist wiring come out, before the electrician starts.
- Give the carpenter the basin and tap model before they measure, not after they have drawn the cabinet.
- Ask how every hidden part is reached later: the trap, the tap, the light strip's driver.
Why the vanity is decided before it exists
Our published process for a single bathroom runs roughly like this: days 1 to 2 hacking, days 3 to 5 plumbing and electrical re-routing, days 7 to 8 the 24-hour ponding test, days 9 to 14 floor screed, tiling and grouting, days 15 to 17 sanitaryware, vanity, mirror and accessories, and days 18 to 20 the false ceiling, lighting, final fittings and handover. A single bathroom takes 2 to 4 weeks.
In a whole-flat job, the 4-room programme on our site puts plumbing and electrical in weeks 2 to 3, waterproofing and tiling in weeks 4 to 5, carpentry installation in weeks 6 to 7, and sanitary fittings in week 8. The timelines differ because one is a bathroom on its own and the other is a whole flat, but they say the same thing in the same order: the pipes and wires that a vanity depends on go in first, the tiles go over them, and the vanity is the last piece to go in.
That is why a vanity is never really chosen at the installation stage. By then you can only choose a vanity that fits the holes already made.
Decision 1: wall-hung or floor-standing, and what basin
Our vanity cabinets are built in our own Singapore carpentry factory, sized to your bathroom, in waterproof construction, with under-counter or vessel basins. So the choice is open: it is not a catalogue size that you have to fit around. That freedom is only useful if it is used early.
A wall-hung vanity leaves the floor open beneath it, so the floor tiling runs through and the bathroom reads as larger. But the supply and waste pipes then come out of the wall and have to be at the right height for that cabinet, which means they are set when the plumbing is re-routed, before the wall is tiled. A floor-standing vanity hides its pipework inside the cabinet, and is more forgiving of where the pipes come out. What it takes away is the open floor.
Whichever you pick, three things go on the drawing before the plumber starts:
- The basin position, measured from a fixed wall and from the door swing, not "somewhere on this side".
- The basin type. An under-counter basin and a vessel basin sit differently on the top and need the tap at a different height.
- Which side the door swings, and what it must clear. A cabinet door that cannot open fully against a shower screen is a design error that no installer can fix on the day.
For HDB bathrooms in flats built before 2003, our published process follows the original wet-area positioning, so that the structural floor slab is not affected. In practice that means the pipes may already decide where the basin can go. Ask your contractor to show you where the existing waste points are before you fall in love with a layout that needs them moved.
Decision 2: the tap
The tap looks like an accessory. It is a plumbing decision. A tap that stands on the basin or the top needs its supply under the counter. A tap that comes out of the wall, like the one in the photo above, needs its pipes inside the wall, a hole in the tile, and a position that is fixed before the tiler starts. You cannot swap one for the other after tiling without opening the wall.
So choose the tap model, or at least its type, before the plumbing is re-routed, and give the model to the contractor and the carpenter. The carpenter needs it to cut the top or the cabinet around it, and the plumber needs it to set the pipes.
Decision 3: the mirror cabinet and its light
The mirror is where the electrical decisions land. Our bathroom work includes anti-fog mirror cabinets, demist mirror wiring, and IP-rated lighting where needed. All of that is wiring, and wiring is run before the tiles.
Settle these on the drawing:
- The mirror cabinet's width and height, because the wire has to come out where the cabinet will be, and a cabinet a little wider than planned can cover a point that you still need to reach.
- Whether the mirror has a light, and what kind. A strip light above or below the mirror, a lit mirror cabinet and a downlight over the basin are three different wiring jobs.
- Whether there is a demist function, because that is a separate wire to the mirror.
- Where the switch goes and whether the mirror light has its own. If the vanity light is the one left on at night, it is worth a switch of its own.
- Where any socket at the basin goes, for a shaver or a hairdryer. Where a socket may safely sit near water is a decision for the licensed electrician, so ask them to mark it on the drawing rather than choosing it on the day.
The room cost calculator publishes a light point and a power point at $90 each, so you can count what the vanity area needs and read it against your quotation. Count before the electrician starts, because adding a point behind a tiled wall means opening it.
Decision 4: the wall behind it
Floor-to-ceiling tiling is standard in our bathroom scope, so the wall behind the vanity will be tiled all the way up. Anything mounted on it later, such as the mirror cabinet, is fixed through tile. If the design has a niche or recessed shelf beside the basin, like the lit niches in the photo, it has to be formed and tiled as part of the wall, not added afterwards. Decide whether you want one before the tiler starts.
Decision 5: how every hidden part is reached later
This is the question owners forget, and the one they are most glad they asked. A vanity hides the trap, the supply pipes and sometimes the light driver. Ask the carpenter and the contractor, in plain words:
- How do I reach the trap under the basin if it needs clearing?
- Where does the light strip's driver sit, and can it be replaced without taking the mirror cabinet off the wall?
- Is the inside of the cabinet in waterproof construction, and what happens if the supply pipe drips?
A good answer names a place and a method. A vague answer is the reason to ask the question before the cabinet is built, not after.
What goes into the quotation
Our quotations itemise the waterproofing, the tile cost per square metre, the sanitaryware, the vanity, the accessories and the labour separately, so a vanity is its own line. Our published range for an HDB bathroom on its own is $5,000 to $12,000, and a full hack-and-retile with a new toilet, basin, mixer, shower, vanity and waterproofing typically falls between $7,000 and $10,000. A range is not a price for your bathroom. We do not publish a price for a vanity or a mirror cabinet, so we do not give one here: it is quoted after a site visit, once the size, the basin and the mirror are known.
Whatever the quotation says, ask for the vanity line to name the basin type, the tap type and the mirror cabinet, because "vanity and mirror" in one line can mean very different things.
A checklist to take to your contractor
- Wall-hung or floor-standing, and under-counter or vessel basin, decided.
- Basin position drawn with measurements from a fixed wall and the door swing.
- Tap type and model given to both the plumber and the carpenter.
- Mirror cabinet size, light, demist function and switch drawn before the electrician starts.
- Any niche or recess agreed before tiling.
- The access answers in writing: trap, supply pipes, light driver.
- Ponding test done before any tile goes down. Our published process is two coats of membrane on the full floor and 1.5m up the wet walls, then the 24-hour test.
Planning the vanity and mirror of a bathroom? WhatsApp us on 9107 2601 with your flat type, your estate and whether it is the common or master bathroom, and we will arrange a site visit to go through it with you. Any price depends on that visit. The full bathroom process is on our bathroom renovation contractors page, the published 4-room programme is on the 4-room HDB renovation cost page, you can run the published electrical rates on the room cost calculator, and you can see more of this flat in our project photos.
Related reading: bathroom mould and the exhaust fan · the ponding test · comparing bathroom quotations line by line